The repo for “Jumpy” is now live, so you can take a peek under the hood and see how it all hangs together. As with this diary it’s not a tutorial or anything like that, so don’t expect much in the way of explanation (other than maybe some notes-to-self). It’s also going to be far from “best practise” coding – prioritising as I am for the game, not the code.
(That said, if you do end up browsing the code and see some tricks I could use, let me know!)
So this is Christmas… and what have I done? Not written a complete Game Boy game that’s for sure.
Back in April I set myself the target of writing a Game Boy game by Christmas, with the idea that if I succeeded I would buy myself a present of a special flash cartridge so I can play it on our original childhood Game Boy. I also kept a diary about it…
A fairly good map of progress being made.
Things were going pretty well until I went off for a long summer vacation and, well, never really returned to the project. Work kicked up a notch and evenings became more of a time for switching the tired ol’ brain off.
But Jumpy is not dead! No! I shall be returning to the project in the new year with a new goal of having the whole game done by my birthday, which conveniently falls right in the middle of the year (and before any summer holiday). I’d try a stretch goal of Easter but who buys themselves presents for Easter? Nah. Let’s hit a summer deadline and put that flash cart on my gift list.
I’ve also decided to go an extra step with “working in the open” and will host the code on Github. Over the new year break I’ll get a clean snapshot of the most recent code up on a repo and each ROM I upload will have the repo tagged. As with the diary my intent is to build up an artefact of progress/learning and not any sort of tutorials to follow. (There are already a bunch of great resources and tutorials out there which I’ve linked up here and here.)
Quick thanks to all the support I’ve had on the adventure so far; the many fantastic folks from around the world dropping into my mentions & hitting retweet. Didn’t get there as quickly as anticipated but hey, no big deal, be kind to yourself and all that. Let’s get you a playable game by summer.
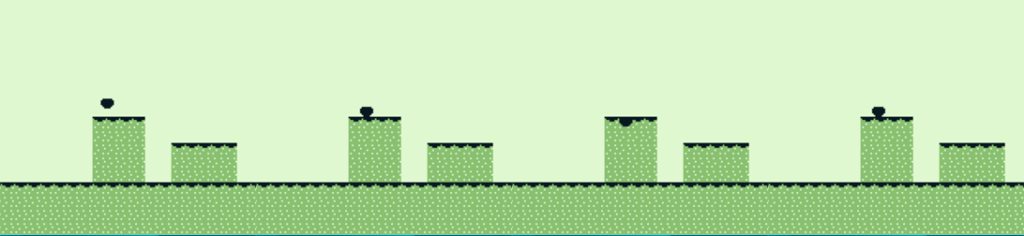
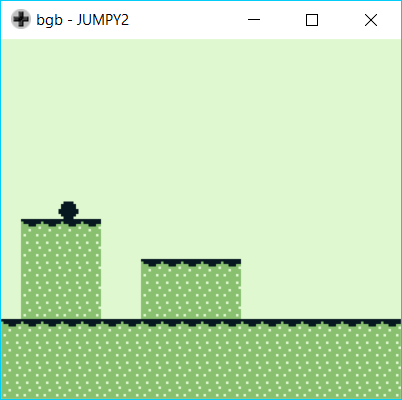
I’m going to come clean about Jumpy’s level (if anyone is actually playing the ROMs?). That clever looping behaviour isn’t specially coded – it’s just what the Game Boy does.
The Game Boy’s VRAM – the part of the memory keeping hold of all the graphics stuff – only actually holds a total width of 32 tiles for the background. If you try to scroll out beyond that it just loops back. Just like traversing the globe, go far enough in any directions and you’ll find yourself back where you were. Only it doesn’t take as long on an 8 KiB Game Boy.
BGB’s excellent VRAM viewer let’s us see this in action. The square outline on the left is what the Game Boy’s screen is currently displaying.
Now, think of pretty much any scrolling platform game. Those courses are significantly longer than this little slice, and I wanted to figure how to do it.
(Once again, I didn’t set out to make a platform game, but pursuing these curious tangents is 90% the point of this project.)
The basic principle seems straightforward enough. Why would the Game Boy give you those extra “off screen” areas unless it expected you to do something with them?
There’s a certain amount loaded ahead of the player, so when that is pulled into view we can replace what has drifted off the other side of the screen with what is to come next. When the viewport loops around, it’ll show those new parts of the level and create the illusion of one long course.
When endlessly looping the same 32 columns of tiles, we were using the same map (generated by Gameboy Map Builder) in code to keep track of both the tiles we drew into the background layer to show the level graphics and to run our collision detection against to see if we’d hit the ground. It gets a little more complex when updating.
A tile map is stored as one long set of tiles, and rendered to screen by specifying the width of the area to fill. This value sets the bound where the single long line of values loops around and starts making new rows. The starting area is 32 columns wide (20 displayed and 12 off to the right) and 18 tall (actually also 32, but as we are only scrolling horizontally we can ignore the other 14 off-screen below). To fill the area we give it an array of 576 tile references and tell it to loop at position 32. This gives us a 32 x 18 background nicely rendered to screen.
Remember in the last post I said that I had done something that seemed to work fine even though it shouldn’t, but in reality it was playing merry hell with lots of subsequent, unrelated instructions? I initially made a map that was wider than 32 tiles. It rendered fine, cropping off the extra. “Oh well”, thought I, and left it. Then I lost my mind on unrelated bugs until I had that “aha” moment, explicitly created a 32×18 map, and all those other issues vanished.
When we do our collision detection we calculate where on this grid the sprite is (or is going to be) by dividing the x & y by 8 (the pixel-size of a tile). Then we can back-calculate it to find which of our 576 values this corresponds to: (32 * y) + x.
We’ve established that when a column of tiles leaves the left-hand side we want to replace it with the next column coming in from the right, so really we have two things to update: the display, and the collision detection map.
First issue: our level is stored as a big looping set of values creating rows, but we want to be appending new columns.
There’s a smart way of calculating the contents of that single column by doing a bit of maths on the big long list of values denoting the floor map. However, I couldn’t quite get C to play nicely. Also, if you can store something statically in an optimised way instead of calculating it each time that’s going to help the Game Boy’s diminutive hardware perform better anyway. So after that first set of 576, I actually store the rest of the level as an array of arrays, each being the contents of a column.
This makes rendering the new column very easy in GBDK. Just keep track of which columns have already been rendered and every time the screen scrolls 8 pixels (again, the width of a tile) render the next set into the right place.
The tricky bit becomes – how do we fix the collision detection? That thing is reading from a 576-tile map. We need to independently update that. This is where we need to calculate which of the VRAM’s 32 columns are updating and jump through the map in intervals of 32 to hit the correct 18 tiles. To illustrate, here’s my code to update the background and the map used for collision detection. The next_vram_location variable is the vram “column” we want to update, incrementing every 8 pixel scroll and looping back to position 0 whenever it hits 32.
set_bkg_tiles(next_vram_location, 0, 1, 18, floormap_full_segments[bkg_columns_scrolled]);
for (i = 0; i < 18; i = i + 1)
{
	floormap[(i * 32) + next_vram_location] = floormap_full_segments[bkg_columns_scrolled][i];
}
Here it is in action:
So satisfying. I <3 you VRAM viewer.
Having sorted that, I built a much bigger course and added a couple of other changes to go along with this: First, when all the tile columns have been rendered, it stops scrolling and you can jump all the way to (but not beyond) the right hand side of the screen.
Secondly, I removed the ability to scroll left.
While it is entirely possible to run similar logic as above but “in reverse” to allow movement in both directions, I kept it simple and didn’t bother. And then it struck me; this is likely just the same reason as why you can’t go back in the early Super Mario games. So I took a look under the hood of a classic.
Nice to have your techniques validated by the professionals. (Copyright Nintendo etc. etc. yes I own the original game thanks for asking)
Mario could never go home because it had been literally destroyed by the future.
Still, looks like Jumpy is on the right track.
Time Spent: It was glorious experimentation so I wasn’t really counting, but probably about 4 hours.
Last update I identified a few bugs, notably to do with bad collision detection when falling on to (or, uh, through) the platforms.
First, the “snapping” bug:
Whup! See that?
Catch that? Let’s look at the frames:
Last time I said
Reading through the code I’m not sure why that is, but I expect I’ll figure it out.
And I figured it out pretty much right after posting. It’s all to do with the hit areas.
When doing collision detection – at least in very simple games – one cannot really afford to do it with very great accuracy. I’m using a very basic method and comparing a single x and y coordinates for each 8×8 tile. Usually you will check the outer “bounding box” around the sprite to see if anything hit you on any side (enemies etc), but right now the only collision I need to check is landing, so that’s the lower bound.
The x and y coordinates for sprite placement are at the top left most extreme of the sprite area. Even though Jumpy is not-square, the area it inhabits is still an 8×8 square.
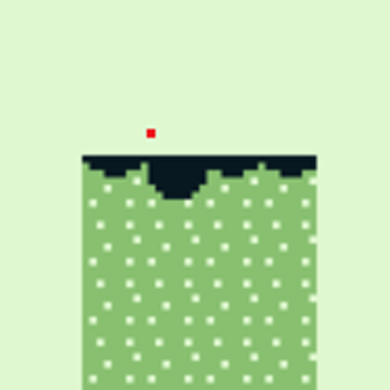
My collision detection has a look to see if the x & y coordinates of jumpy is going to move on top of a tile it should actually land on, and if yes instead snap to the top of the that tile and stop falling. In this bug it’s falling for one tile more than it should. Let’s take a look at that one erroneous frame but with Jumpy’s x & y coordinate marked in red.
I think I see the problem
According to the collision check, Jumpy was still above the ground and so being where it is is perfectly valid. It’s not until the next frame that the x & y spot overlaps the ground tile and our “landing” code kicks in.
Easy fix. Amend the checking code to instead look at the bottom of the sprite box (the y coordinate + 8) and, heck, let’s move the x coordinate to the mid-point (x + 4) while we’re at it so Jumpy doesn’t fall through platforms when only off by 1 pixel to the left.
So, that other bug:
If you’re falling quickly (i.e. big jumps in position) you can go right through a platform. Try jumping from the high platform to the low one 🙂
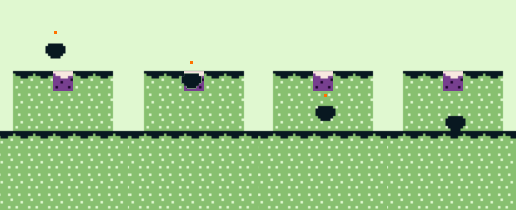
Any guesses? Let’s map that out with the x & y coordinate (remembering that we hadn’t fixed the previous bug yet) and for visibility invert the tile we were expecting to hit.
(I accidentally put the red dot at the mid-x point in this image, but what we’re interested in is actually the y position so the illustration is still valid)
Yup. We’re falling so quickly that the x & y check point never actually overlaps that 8×8 ground tile. Another straightforward fix: if we’re falling more than 8 pixels at a time then also check the tile above the one we are currently overlapping.
I could do this all day.
All done and good. As mentioned previously, my brain offered the bug-fix solution shortly after the last post was published, and the extra collision detection checks are very straightforward. So why did it take me about 5 hours to actually fix? 😳
C is a pretty low level language. If you don’t know what you’re doing, things can look OK but really not be OK under the hood.
In this case implementing a simple fix inside the collision detection just plain didn’t work. The logic checked out but running the code very much did not. I put in a printf to spit out what was in the variables, and something magical happened. The code worked!
But it was bad magic. Take the printf out again and the code didn’t work. It drove me nuts. I tried putting in a delay (in case of race conditions. Race conditions probably aren’t a thing on a 4.19MHz processor, but who knows), no joy. I tried removing pointers (I read up that printf calls malloc() and something-something pointers), again, nothing.
My learning was this: C is unforgiving. You do something wrong somewhere else and it is functionally fine but as you build on that hidden fault other strange things happen in code where it really shouldn’t.
I already knew this about C, but I hadn’t first-hand experienced it. This really isn’t one of the “ah, well, I knew what you meant, buddy, I’m still going to do what you almost asked.” set of languages. Sure it’s frustrating at times, but likely in the pursuit of become a far more attentive programmer. That’s going to serve me well if I’m going to do anything interesting on such a limited device as the Game Boy.
In the end I got it working by trial-and-error refactoring, but I later discovered that critical “first” hidden mistake I was making. More on that next update.
I didn’t intend to return to Jumpy, but apparently it was a fan favourite (_a_ fan, singular). I also don’t explicitly intend to write a platform game, but I fancied iterating on the little, uh, thing so here we are!
I imparted a new super power – moving sideways while jumping – in about 10 minutes. But then of course it needed something to jump on. How the heck do you do that?
Well, Gameboy Map Builder is how you draw the background, and I learned a neat trick from the GamingMonsters YouTube tutorials (again) whereby you can simply reference the background sprite map directly to figure out whether sprites are colliding with anything interesting. Super neat. I lifted that code out almost verbatim.
Of course, physics in a platformer are never that simple, but I got there.
I didn’t make a GIF this time, so you’ll just have to play the ROM below!
I continued to play and iterate (and learn!) and managed to implement a scrolling effect that kicks in depending on how far left/right you are on the screen, Mario style.
The complexity there is that we need to track the scroll position of the background in order to make sure we can still use our logic to determine where the platforms are. A bit brain-bending for a programmer so used to having a console.log() to spit out everything that’s going on, but ended up fairly trivial.
There are a few bugs to sort:
If you’re falling quickly (i.e. big jumps in position) you can go right through a platform. Try jumping from the high platform to the low one 😉
Sometimes there’s a glitch when landing before you “snap” to the level of the platform. Reading through the code I’m not sure why that is, but I expect I’ll figure it out.
Nothing happens when you fall in the hole. Just jump out!
Finally there’s a couple of things I failed to figure out if anyone reading has any tips:
If you are using a UINT16 variable, any value returned FALSE for a comparison operator > 0
I wrote up that to illustrate my issue but I wasn’t running exactly as such. Maybe I’m slipping up somewhere but in the end I just used the UINT8 and figured I’d look more closely when I needed a longer level.
SPEAKING OF WHICH
The neat background-scrolling tile-offset-calculating method I have used will totally fall down when I want longer levels. The VRAM is total 32 tiles wide (this version here is the maximum width!) so I’m going to need to swap background tiles in and out. Unless there’s another way? I’m not sure there is so I might give that ago if anyone wants Jumpy III?
(Here’s code. floortiles.c and eggy.c are the same as the previous post)
I made a basic animation (a little orbiting thingy) and created three instances set to animate at different speeds.
The basic instance was the same, except each one tracked which sprite id it was assigned (necessary) and tallied up the number of run loops since it last animated. If the loop count was the same as its individually assigned number-of-loops-before-you-animate number, it updated its sprite and reset the count.
It worked!
The gif doesn’t loop properly, so download the ROM below!
Oh hey, would you like to see the code? 3 files: orbit.c for the sprite data, Orbiter.c for the struct, and varitrack.c for the actual “game” code.
# varitrack.c

#include <gb/gb.h>
#include <gb/drawing.h>
#include "orbit.c" // Sprites
#include "Orbiter.c" // "Orbiter" struct

struct Orbiter orbiter_slow;
struct Orbiter orbiter_medium;
struct Orbiter orbiter_fast;

void setuporbiter(struct Orbiter* orbiter) {
	orbiter->currentanimationframe = 0;
	orbiter->framessincelastanimation = 0;
}

void animateorbiter(struct Orbiter* orbiter) {
	if (orbiter->framessincelastanimation == orbiter->animationspeed) {
		// animate!
		orbiter->currentanimationframe += 1;
		if (orbiter->currentanimationframe == 8) {
			orbiter->currentanimationframe = 0;
		}
		orbiter->framessincelastanimation = 0;
	} else {
		// increment frame
		orbiter->framessincelastanimation += 1;
	}
	set_sprite_tile(orbiter->spriteid, orbiter->currentanimationframe);
}

void main() {
	// Load the sprite data
	set_sprite_data(0, 8, orbit);

	// Set the defaults for each orbiter
	setuporbiter(&orbiter_slow);
	setuporbiter(&orbiter_medium);
	setuporbiter(&orbiter_fast);

	// set up sprite references
	orbiter_slow.spriteid = 0;
	orbiter_medium.spriteid = 1;
	orbiter_fast.spriteid = 2;

	// Set up the different animation speeds
	orbiter_slow.animationspeed = 20;
	orbiter_medium.animationspeed = 10;
	orbiter_fast.animationspeed = 5;

	// Initial setup
	set_sprite_tile(0, 0);
	move_sprite(0, 20, 20);
	set_sprite_tile(1, 0);
	move_sprite(1, 30, 30);
	set_sprite_tile(2, 0);
	move_sprite(2, 40, 40);
	SHOW_SPRITES;

	while(1){
		// Animate each of them
		animateorbiter(&orbiter_slow);
		animateorbiter(&orbiter_medium);
		animateorbiter(&orbiter_fast);
		wait_vbl_done();
	}
}
I imagine that keeping the orbiter objects in some kind of array would simplify the code further. I’d also look to have them move about at different speeds. Largely though that’s just extrapolation of this proof of concept, which works! Hurrah!
After the last installment, I’ve been dipping back into GamingMonsters’ video tutorials around GBDK and absorbing some of the concepts. I didn’t follow along in code, but instead used it to sort out what was the “done way” of structuring simple game code. See, I’ve done a lot of coding in the past but that’s always been for web frontend/backend (and a little bit of Arduino stuff in C), which is obviously totally different from games.
After watching a few (and learning a neat trick about more performant delays using wait_vbl_done() instead of delay()) I considered that the thing I’ll probably have the hardest time getting my head around is having multiple things going on at once. By that I mean sprites animating at different parts of their cycle, possibly at different speeds, while other things on screen need to be doing their own thing. There’s one loop to control it all and – if you stick a delay in somewhere to slow things down well, then everything will get slowed down. I imagine this is second nature to seasoned game programmers and there are some well-known methods to deal with it but, well, I’ll get to that when I do.
OK, so that aside I took a few days off the project to do other things, then came back tonight to try and put some things together just shooting from the top of my head – not necessarily looking anything up – to see what has stuck in the old grey matter so far.
I decided to make a small… thing.
I called it “Jumpy”. Guess why.
Sprites and backgrounds! Nice. Game Boy Tile Designer and Game Boy Map Builder in action.
I then decided to add some “idling” animation just to start flexing that “keeping track of the little things” muscle.
It’s a little gross perhaps, but good enough for now.
Then, yes, as you probably guessed I made it jump when you press the “A” button. But more than that! I wanted to:
Play a sound when it jumped
Have some kind of physics to bring it back to the ground
Have the animation change depending on where it was in the jump
Came out pretty well:
You’ll have to download the ROM to hear the sound. It goes “BOOP.”
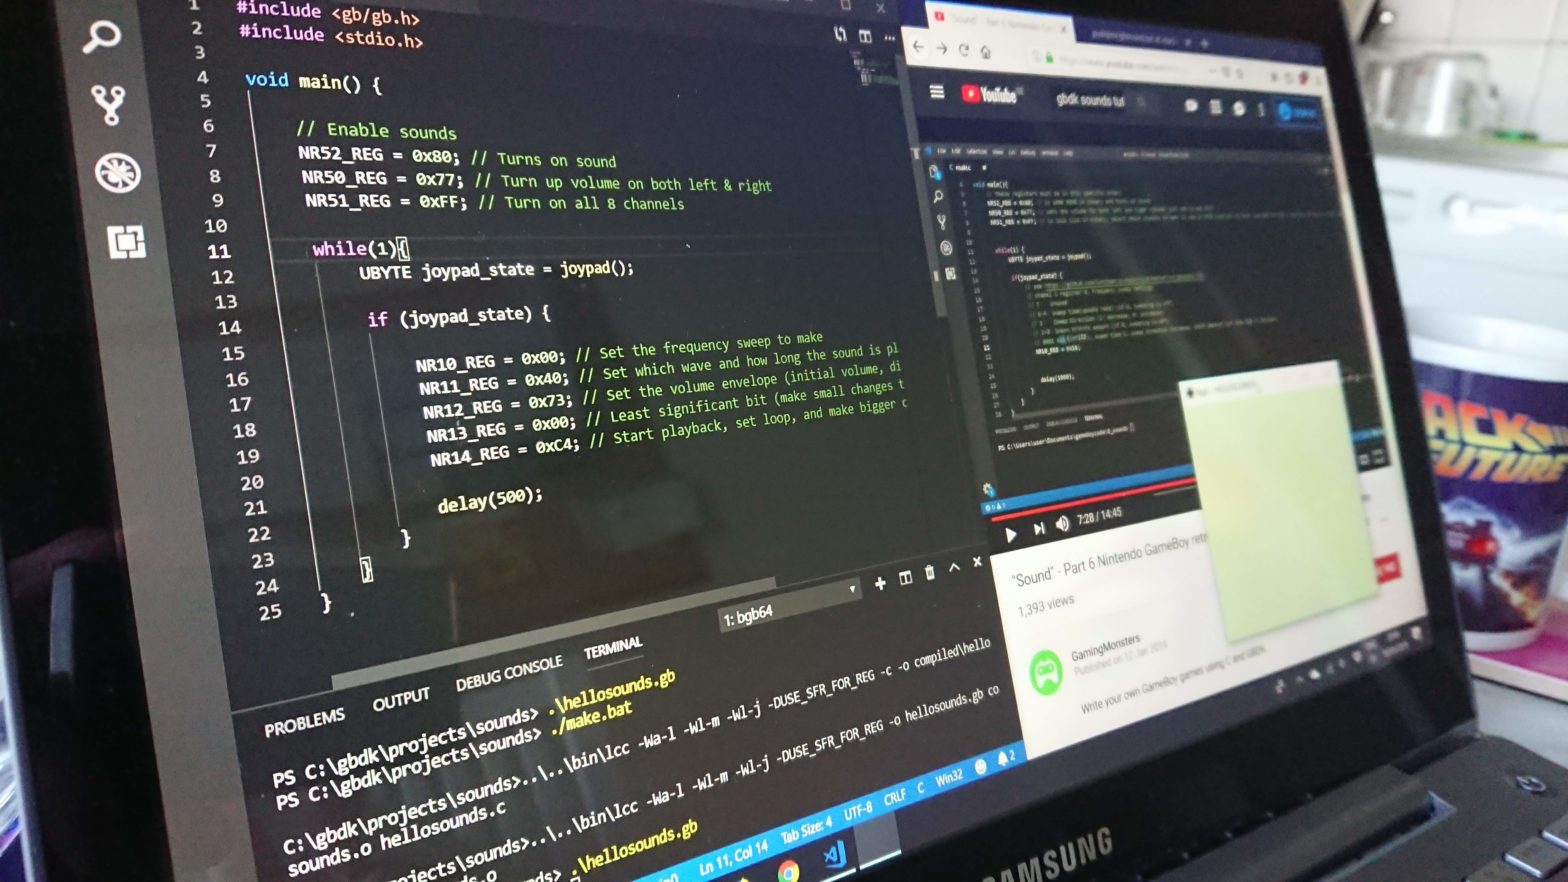
Yesterday’s adventure was probably a little “run before you can walk”, so today I went back to basics with the help of a really nice tutorial from GamingMonsters.
It did the trick – within half-an-hour I had the basics up and running as per the tutorial (no copy/pasting! I want to learn this!). I then spent another hour messing around with values, figuring out concurrent notes, and even got a basic percussion noise working.
Takeaways: this stuff if pretty badly documented (unless you know of any good docs, particularly on the percussion stuff).
No ROM today because I started mangling my code into some kind of weird interactive instrument and decided to call it a day before it was remotely functional. Maybe next time.
Back after a break (busy time at work). I figured that basic graphics and stuff was going pretty well so I’d do a quick music test. Turns out it’s a steep on-boarding.
So far I have figured out three options:
Make awesome music with something like LSDJ. This is geared towards making awesome music, but eats all the Game Boy resources and definitely not the thing to do if you want to use the music as backing for a game. Strike that one then.
Make music using a lighter Game Boy tracker like Carillon and use some provided in-game playback functions. Unfortunately GBDK wasn’t an original consideration by the author but someone else has made tooling for that. Anecdotally this route seems popular.
Use MOD2GBT – a way to write music on a PC based tracker then convert for use on Game Boy. GBDK support is, however, discontinued and only exists in legacy format.
I had a play for an hour and managed to do two things:
Made some fun music using Carillon but totally failed to get it to work with GBDK.
Figured out how to use MOD2GBT to convert music, but failed to actually make any with OpenMPT.
I’m not sure what my preferred workflow is and therefore which to persevere with. I really enjoyed using Carillon (in an emulator for now) to make music. I’m also no stranger to trackers having grown up messing around with ScreamTracker3 and Fast Tracker II (long live Lizardking) so I could probably work out OpenMPT if I give it more than 10 minutes. The thing with evening projects is that I get pretty tired pretty quickly.
I’ll probably give that Carillon->GBDK workflow another try.
Mostly browsing around and dipping into topics like how to display text and what music entails. Came across a few interesting looking resources by accident too. So here’s a linkdump:
OpenMPT – an open source tracker which seems pretty popular these days. Yay trackers! Looking forward to getting back into those!
And the big news was I upgraded my IDE from *ahem* Notepad to Visual Studio Code – seems pretty good and snappy. Oh, and I installed gcc via Cygwin in order to compile mod2gb.
Time Spent: 1hr 45 minutes of glorious, semi-focussed browsing around.